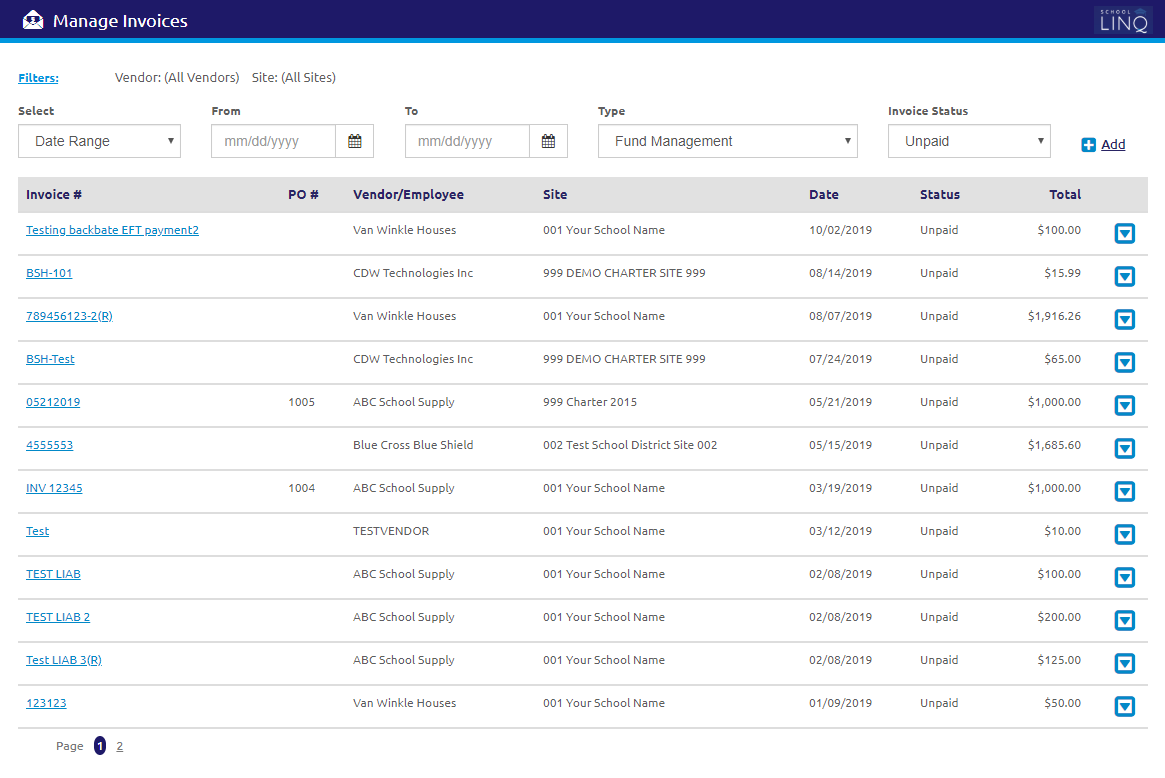
Manage Invoices in Accounts Payable
Manage Invoices allows users to accrue new invoices for payment and view, modify, or delete existing invoices.
Add / Edit Filters
- Click the
 link. The Add / Edit Filters form will display.
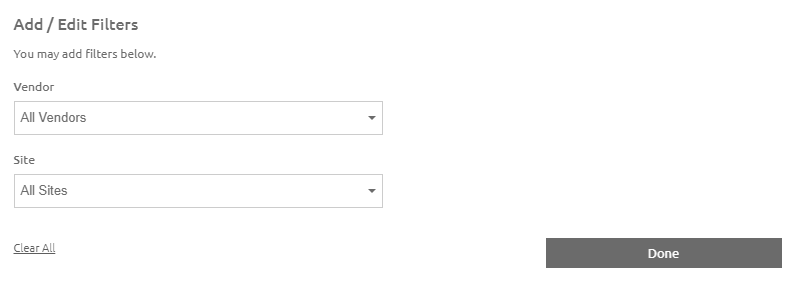
- Select a vendor from the Vendor drop-down list.
- Select a site from the Site drop-down list.
- The grid will refresh on the next form.
- Click the
.png) button.
button.
Search Invoices
- Select Date Range or Invoice Number from the Select drop-down list.
-
Enter or select a date range using the Calendar feature in the From and To fields.
- Select an invoice type from the Type drop-down list.
- Select an invoice status from the Invoice Status drop-down list.
-
Click the
 icon to view, edit, delete, or duplicate an invoice.
- Click the
 link to delete the selected invoice.
 - Click the
 link to create a new invoice by making a copy of the selected invoice. The Create New Invoice form will display.
 - Click the
 button to view or edit the selected invoice. The View / Edit Invoice form will display.
- Click the
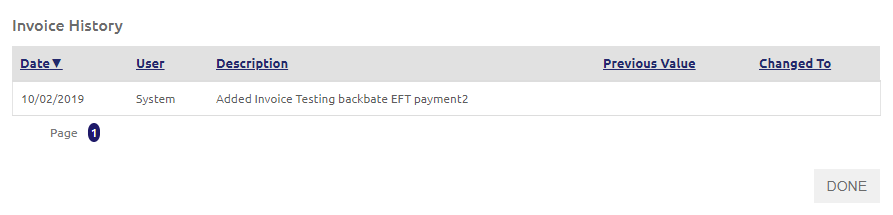
 button in the upper right-hand corner to view an audit history of the invoice. The Invoice History window will display.
- Click the
Create New Invoice
- Click the
.png) link. The Create New Invoice form will display.
link. The Create New Invoice form will display.
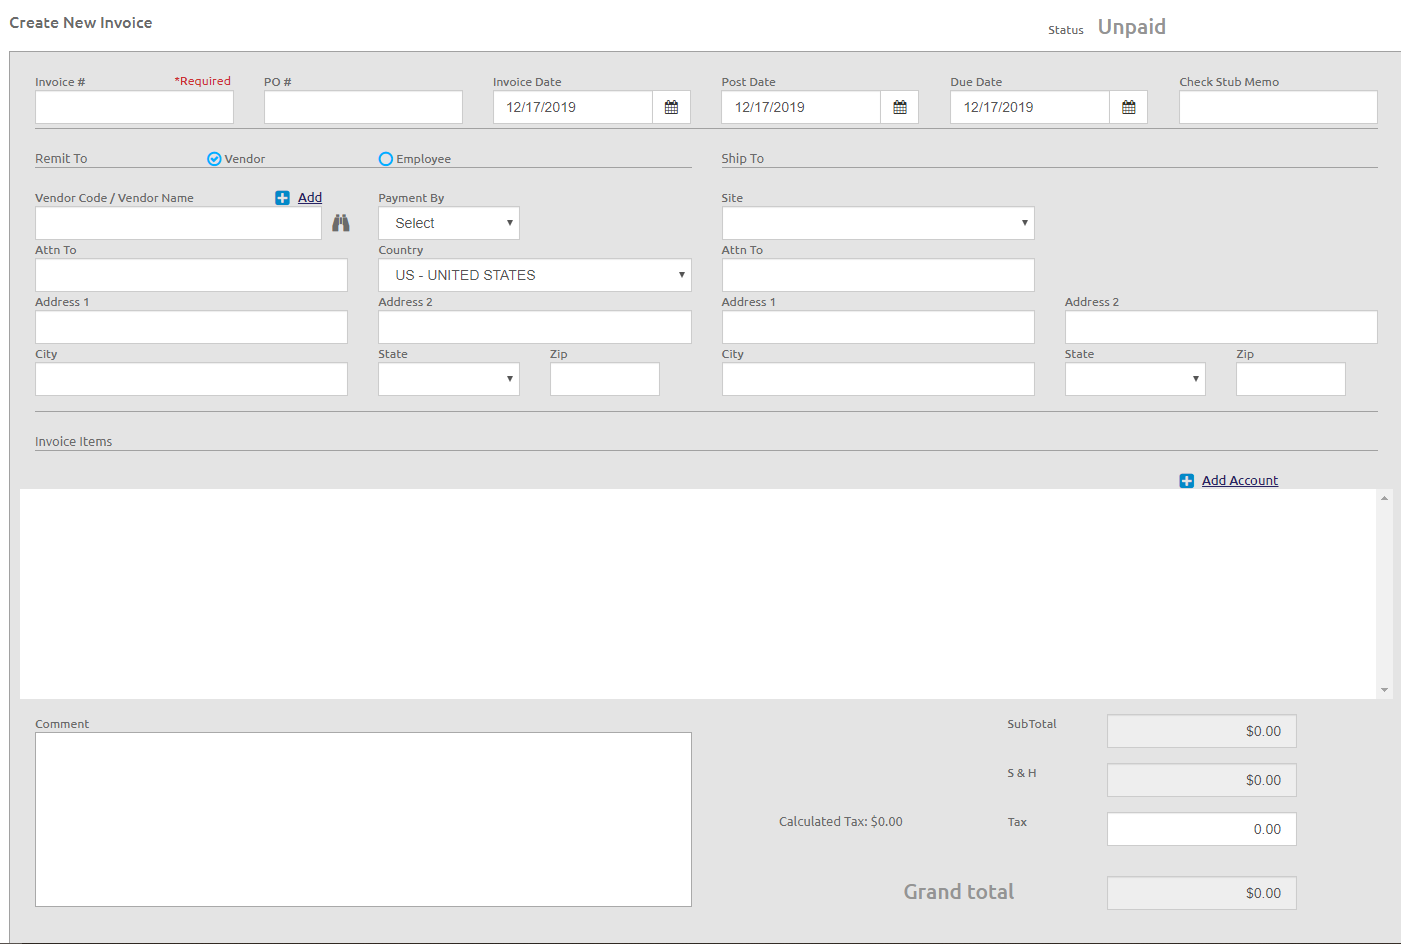
Invoice Info
- The Status of Paid or Unpaid will display at the top right-hand side of the form.
- Enter the invoice number in the Invoice # field.
- An error message will display if a duplicate invoice number for an employee is entered.
- Enter the PO number in the PO # field if the invoice is against a PO.
- If a PO # is entered, the invoice information will default from the PO, but this is editable.
- Check the Close PO box to close the PO when the invoice is saved, even if it was not fully invoiced.
-
Enter or select the Invoice Date, Post Date, and Due Date using the Calendar feature in the respective fields.
- The Invoice Date cannot be prior to the PO Date when an invoice attached to PO.
- The Post Date must be in an open fiscal month and cannot be before the Invoice Date.
- A warning message will display on save if the Post Date is outside of the current Fiscal Year.
- A warning message will display on save if the Post Date is in a 'Closed' month.
- Enter a memo to be displayed on the check stub in the Check Stub Memo field.
- The field has a maximum length of 50 characters.
- This can be used to notate information on the check stub from the invoice to the vendor.
- This field is editable on Payroll invoices.
Remit to Address
- Select Vendor or Employee to Remit To.
- If Vendor is selected, complete one of the following steps:
- Enter a Vendor Code.
- Enter a Vendor Name.
- Click the
 icon to search for a vendor.
 - Click the link to add a new vendor.
- NOTE: If this invoice is attached to a PO, the vendor information will be automatically filled in from the PO.
- If Employee is selected, enter the employee name in the Employee Name field.
- If Vendor is selected, complete one of the following steps:
- Select an option from the Payment By drop-down list for how the vendor will be paid.
- The default is Check unless a vendor is specifically flagged for EFT, in which the selection will be defaulted to EFT.
- Both payment options are available for any vendor and can be changed on the invoice as needed.
- If Check is selected, check the Separate Check box if you want to print a separate check for the invoice in the event that multiple invoices to the same vendor are processed for payment at the same time.
Ship to Address
This information will be automatically populated based on the Site selected, but this is editable.
Invoice Items
- Enter the account number in the Account # field, or click the icon to search for an account number.
- A Payroll account (if your district is licensed to use Payroll) may be used on an invoice by entering the full account number.
- The Description is based on the Account # and is read-only.
- Enter
the quantity of this item in the Quantity field.
- If an item is missing completely, change the inventory Quantity to zero.
The Quantity entry is required to be greater than zero on stand-alone invoices (no PO attached).
- Enter the quantity code in the Unit field.
- Enter the line description in the Description field.
- Select an event from the Event drop-down list. This is optional
- Enter the unit cost in the Unit Cost field.
- The Item Total will be calculated automatically.
- Select the type from the Type drop-down list.
- Click the
 button to edit the Tax Rate. Rates are defaulted from the sales tax information set up on the vendor.
- The Tax and Line Totals will be calculated automatically.
-
If this the amount on this line should not be included on the vendor’s 1099, check the Reimb box to mark this line as a reimbursement amount.
- Click the
 icon to delete any line or account.
 - Click the
 link to add a line for Shipping and Handling.
 - Click the
 link to add an additional for this account code to the invoice.
Comments and Amount Totals
- Add comments in the Comment field, if necessary. The Comment field is editable on Payroll invoices.
- The Subtotal is the total of all lines on this invoice.
- Enter the sales tax amount from the invoice in the Tax field.
- The sales tax amount calculated based on the line totals and sales tax rates will show as the Calculated Sales Tax amount.
- Any difference between the sales tax amount paid and the calculated sales tax amount will show on the Sales Tax Due Report.
- Verify that the Grand total matches the amount due for this invoice.
- Click the
 button.
©2021 | EMS LINQ, Inc.
School LINQ Help, updated 01/2021